

Deploying a Flask application manually can lead to dependency issues and inconsistencies across different environments. Docker solves this problem by packaging applications into containers, ensuring they run seamlessly on any system.
In this article, we’ll learn how to Dockerize a Flask app step by step. We will cover:
- The basics of Docker and why it is useful.
- Creating a Dockerfile for a Flask app.
- Building a Docker image.
- Running the Flask application in a Docker container.
- Testing the application locally.
- Best practices for running Flask applications with Docker.
Setting Up a Flask App for Docker
Let’s create a simple Flask API and containerize it using Docker.
File Structure
The file structure of our application should look like this:
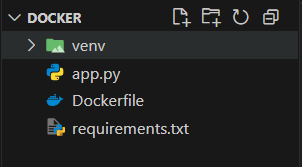
- app.py: Contains the Flask application code, defining routes and app behavior. Here, it has a simple route that shows a welcome message.
- Dockerfile: Specifies instructions for building a Docker image, including the base Python image, required files, dependencies, and the command to run the app.
- requirements.txt: Lists the Python libraries needed for the app (like Flask) so Docker can install them during the build process.
Step 1: Create a Flask App
Inside the project folder, create app.py:
from flask import Flask

app = Flask(__name__)

@app.route('/')
def home():
    return "Welcome to Flask with Docker!"

if __name__ == "__main__":
    app.run(host="0.0.0.0", port=5000)
Explanation:
- host="0.0.0.0" allows external access to the app.
- port=5000 sets the server port.
Step 2: Create requirements.txt
The requirements.txt file lists all the dependencies required for a Python project. It allows easy installation of all the dependencies that are used in the application.
To create requirements.txt file for our application, use this command:
pip freeze > requirements.txt
To install all the dependencies from the requirements.txt file, use this command:
pip install -r requirements.txt
Step 3: Writing the Dockerfile
A Dockerfile contains instructions to create a Docker image. Create Dockerfile (without an extension) in the project folder and add the following content in it:
# Use an official lightweight Python image
FROM python:3.9-slim
# Set the working directory
WORKDIR /app
# Copy project files into the container
COPY . /app
# Install dependencies
RUN pip install -r requirements.txt
# Expose port 5000 for Flask
EXPOSE 5000
# Command to run the app
CMD ["python", "app.py"]
Building and Running the Docker Container
Step 1: Build the Docker Image
Run this command in the terminal:
docker build -t flask-docker-app .
- -t flask-docker-app assigns a tag (name) to the image.
- . refers to the current directory where the Dockerfile is located.
Step 2: Run the Docker Container
docker run -p 5000:5000 flask-docker-app
- -p 5000:5000 maps the container’s port 5000 to the local machine.
Step 3: Test the Flask App
Open a browser and visit:
http://localhost:5000 You should see:
This confirms that the Flask application is running successfully inside the Docker container.

Best Practices
- Choose official, lightweight base images.
- Optimize the Dockerfile and image size.
- Store secrets securely using environment variables or Docker secrets.
- Use health checks to monitor containers.
- Monitor logs and application performance.
- Use Kubernetes or Docker Swarm for large-scale deployments.