Accept a payment
Securely accept payments online.
Build a payment form or use a prebuilt checkout page to start accepting online payments.
Not a developer?
Use Stripe’s no-code options or apps from our partners to get started and do more with your Stripe account—no code required. If you use a third-party platform to build and maintain a website, you can add Stripe payments with a plugin.
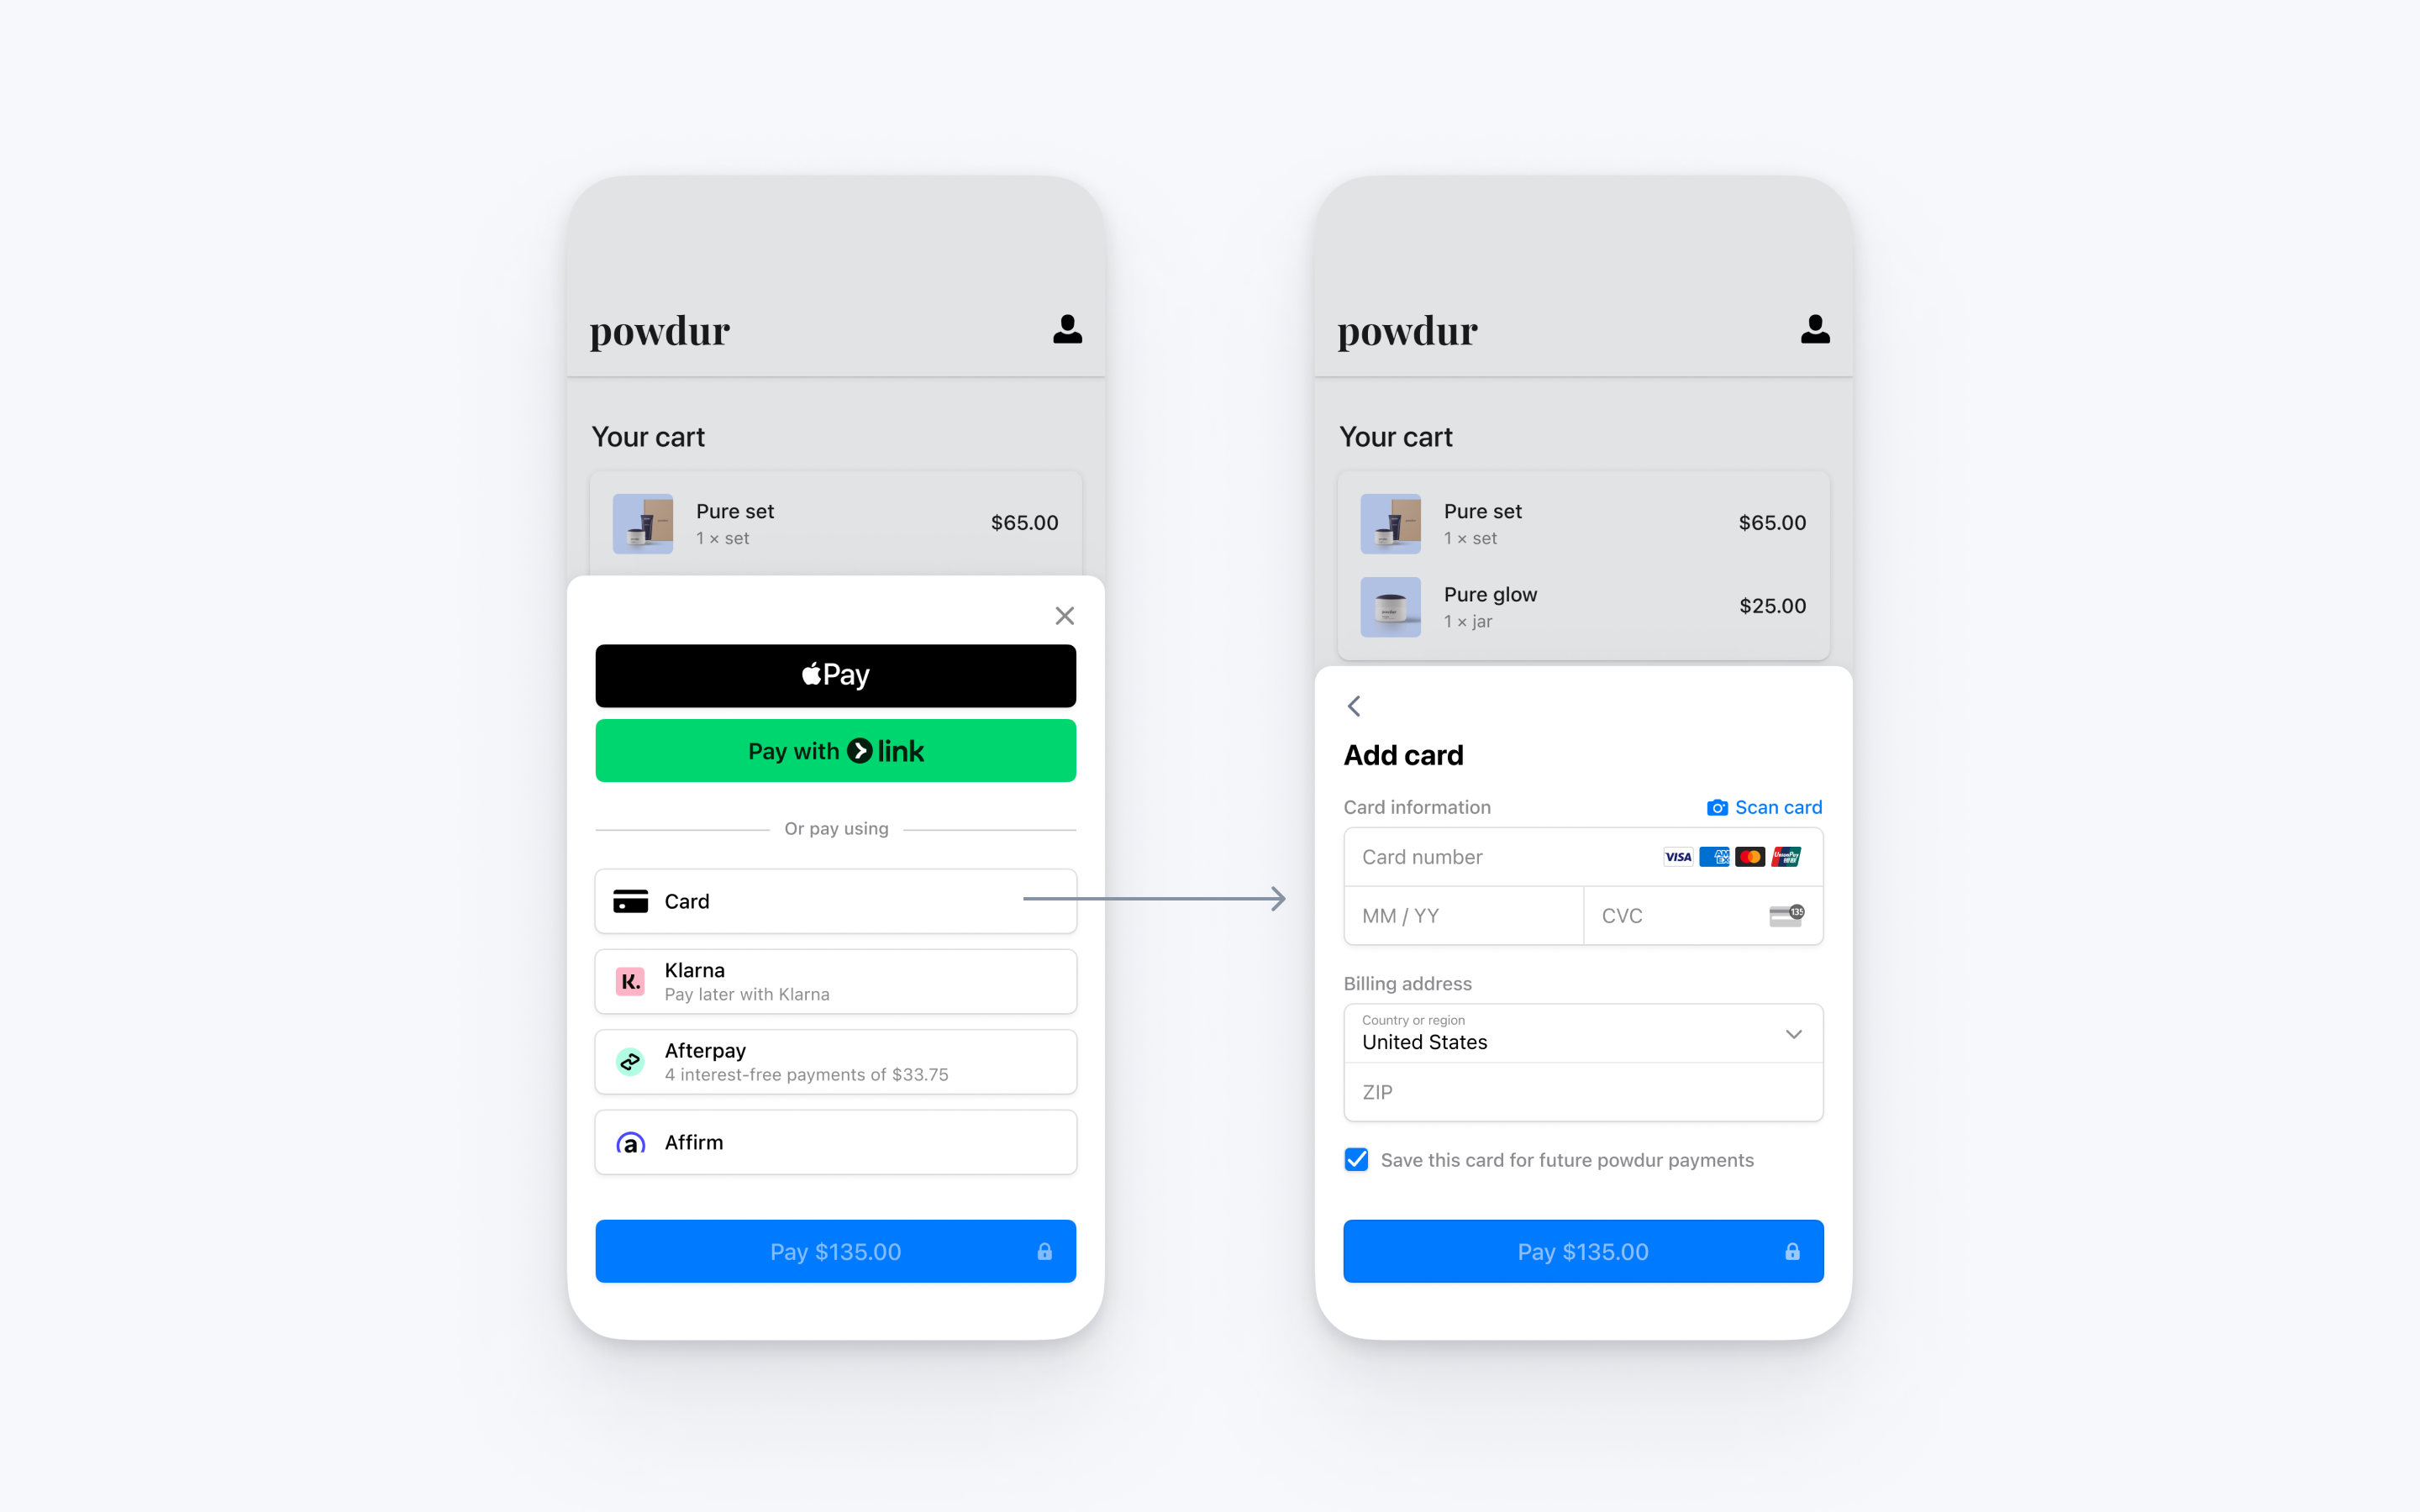
Integrate Stripe’s prebuilt payment UI into the checkout of your iOS app with the PaymentSheet class. See our sample integration on GitHub.
Alternatively, start with the code quickstart to build or download a runnable example.
Accounts v2 API support
The Payment Sheet doesn’t support customer-configured Accounts. It only supports Customer objects.
Set up StripeServer-sideClient-side
First, you need a Stripe account. Register now.
Server-side
This integration requires endpoints on your server that talk to the Stripe API. Use our official libraries for access to the Stripe API from your server:
Client-side
The Stripe iOS SDK is open source, fully documented, and compatible with apps supporting iOS 13 or above.
To install the SDK, follow these steps:
- In Xcode, select File > Add Package Dependencies… and enter
https://github.as the repository URL.com/stripe/stripe-ios-spm - Select the latest version number from our releases page.
- Add the StripePaymentSheet product to the target of your app.
Note
For details on the latest SDK release and past versions, see the Releases page on GitHub. To receive notifications when a new release is published, watch releases for the repository.
Enable payment methods
View your payment methods settings and enable the payment methods you want to support. You need at least one payment method enabled to create a PaymentIntent.
By default, Stripe enables cards and other prevalent payment methods that can help you reach more customers, but we recommend turning on additional payment methods that are relevant for your business and customers. See Payment method support for product and payment method support, and our pricing page for fees.
Add an endpointServer-side
Note
To display the PaymentSheet before you create a PaymentIntent, see Collect payment details before creating an Intent.
This integration uses three Stripe API objects:
- PaymentIntent: Stripe uses this to represent your intent to collect payment from a customer, tracking your charge attempts and payment state changes throughout the process.
- (Optional) Customer: To set up a payment method for future payments, you must attach it to a customer. Create an object to represent your customer when they create an account with your business. If your customer makes a payment as a guest, you can create a
Customerobject before payment and associate it with your own internal representation of the customer’s account later. - (Optional) CustomerSession: Information on the object that represents your customer is sensitive, and can’t be retrieved directly from an app. A
CustomerSessiongrants the SDK temporary scoped access to theCustomerand provides additional configuration options.
Note
If you never save cards for customers, you can omit the Customer object and the CustomerSession object from your integration.
For security reasons, your app can’t create these objects. Instead, add an endpoint on your server that:
- Retrieves the
Customerobject or creates a new one. - Creates a CustomerSession for the
Customer. - Creates a
PaymentIntentwith the amount, currency, and customer. - Returns the
PaymentIntent’s client secret, theCustomerSession’sclient_, thesecret CustomerID, and your publishable key to your app.
Set the same Customer on the PaymentIntent that you set on the CustomerSession.
The payment methods shown to customers during the checkout process are also included on the PaymentIntent. You can let Stripe pull payment methods from your Dashboard settings or you can list them manually. Regardless of the option you choose, know that the currency passed in the PaymentIntent filters the payment methods shown to the customer. For example, if you pass eur on the PaymentIntent and have OXXO enabled in the Dashboard, OXXO won’t be shown to the customer because OXXO doesn’t support eur payments.
Unless your integration requires a code-based option for offering payment methods, Stripe recommends the automated option. This is because Stripe evaluates the currency, payment method restrictions, and other parameters to determine the list of supported payment methods. Payment methods that increase conversion and that are most relevant to the currency and customer’s location are prioritized.
You can manage payment methods from the Dashboard. Stripe creates the PaymentIntent using eligible payment methods you’ve configured, based on factors such as the transaction’s amount, currency, and payment flow. If you don’t want to use the Dashboard, or if you want to specify the allowed payment methods manually, you can use the allowed_ parameter.
# Create a Customer (use an existing Customer ID if this is a returning customer)
curl https://api.stripe.com/v1/customers \
  -u sk_test_...: \
  -X "POST" \
  -H "Stripe-Account: {{CONNECTED_ACCOUNT_ID}}"

# Create a CustomerSession for the Customer
curl https://api.stripe.com/v1/customer_sessions \
  -u sk_test_...: \
  -X "POST" \
  -d "customer"="{{CUSTOMER_ID}}" \
  -d "components[mobile_payment_element][enabled]"=true \
  -d "components[mobile_payment_element][features][payment_method_save]"=enabled \
  -d "components[mobile_payment_element][features][payment_method_redisplay]"=enabled \
  -d "components[mobile_payment_element][features][payment_method_remove]"=enabled

# Create a PaymentIntent
curl https://api.stripe.com/v1/payment_intents \
  -u sk_test_...: \
  -X "POST" \
  -d "customer"="{{CUSTOMER_ID}}" \
  -d "amount"=1099 \
  -d "currency"="eur" \

  -d "automatic_payment_methods[enabled]"=true \
Collect payment detailsClient-side
To display the mobile Payment Element on your checkout screen:
- Display the products the customer is purchasing along with the total amount
- Use the Address Element to collect any required shipping information from the customer
- Add a checkout button to display Stripe’s UI
Create an ObservableObject model for your checkout screen. This model publishes a PaymentSheet and a PaymentSheetResult.
import StripePaymentSheet
import SwiftUI

class CheckoutViewModel: ObservableObject {
  let backendCheckoutUrl = URL(string: "Your back-end endpoint/payment-sheet")! // Your back-end endpoint
  @Published var paymentSheet: PaymentSheet?
  @Published var paymentResult: PaymentSheetResult?
}
Fetch the PaymentIntent client secret, CustomerSession client secret, Customer ID, and publishable key from the endpoint you created in the previous step. Use STPAPIClient. to set your publishable key and initialize the PaymentSheet.
@_spi(CustomerSessionBetaAccess) import StripePaymentSheet
import SwiftUI

class CheckoutViewModel: ObservableObject {
  let backendCheckoutUrl = URL(string: "Your back-end endpoint/payment-sheet")! // Your back-end endpoint
  @Published var paymentSheet: PaymentSheet?
  @Published var paymentResult: PaymentSheetResult?

  func preparePaymentSheet() {
    // MARK: Fetch the PaymentIntent and Customer information from the back end
    var request = URLRequest(url: backendCheckoutUrl)
    request.httpMethod = "POST"
    let task = URLSession.shared.dataTask(with: request, completionHandler: { [weak self] (data, response, error) in
      guard let data = data,
            let json = try? JSONSerialization.jsonObject(with: data, options: []) as? [String : Any],
            let customerId = json["customer"] as? String,
            let customerSessionClientSecret = json["customerSessionClientSecret"] as? String,
            let paymentIntentClientSecret = json["paymentIntent"] as? String,
            let publishableKey = json["publishableKey"] as? String,
            let self = self else {
        // Handle error
        return
      }

      STPAPIClient.shared.publishableKey = publishableKey
      // MARK: Create a PaymentSheet instance
      var configuration = PaymentSheet.Configuration()
      configuration.merchantDisplayName = "Example, Inc."
      configuration.customer = .init(id: customerId, customerSessionClientSecret: customerSessionClientSecret)
      // Set `allowsDelayedPaymentMethods` to true if your business handles
      // delayed notification payment methods like US bank accounts.
      configuration.allowsDelayedPaymentMethods = true

      DispatchQueue.main.async {
        self.paymentSheet = PaymentSheet(paymentIntentClientSecret: paymentIntentClientSecret, configuration: configuration)
      }
    })
    task.resume()
  }
}

struct CheckoutView: View {
  @ObservedObject var model = CheckoutViewModel()

  var body: some View {
    VStack {
      if model.paymentSheet != nil {
        Text("Ready to pay.")
      } else {
        Text("Loading…")
      }
    }.onAppear { model.preparePaymentSheet() }
  }
}
Add a PaymentSheet.PaymentButton to your View. This behaves similarly to a SwiftUI Button, which allows you to customize it by adding a View. When you tap the button, it displays the PaymentSheet. After you complete the payment, Stripe dismisses the PaymentSheet and calls the onCompletion handler with a PaymentSheetResult object.
@_spi(CustomerSessionBetaAccess) import StripePaymentSheet
import SwiftUI

class CheckoutViewModel: ObservableObject {
  let backendCheckoutUrl = URL(string: "Your back-end endpoint/payment-sheet")! // Your back-end endpoint
  @Published var paymentSheet: PaymentSheet?
  @Published var paymentResult: PaymentSheetResult?

  func preparePaymentSheet() {
    // MARK: Fetch the PaymentIntent and Customer information from the back end
    var request = URLRequest(url: backendCheckoutUrl)
    request.httpMethod = "POST"
    let task = URLSession.shared.dataTask(with: request, completionHandler: { [weak self] (data, response, error) in
      guard let data = data,
            let json = try? JSONSerialization.jsonObject(with: data, options: []) as? [String : Any],
            let customerId = json["customer"] as? String,
            let customerSessionClientSecret = json["customerSessionClientSecret"] as? String,
            let paymentIntentClientSecret = json["paymentIntent"] as? String,
            let publishableKey = json["publishableKey"] as? String,
            let self = self else {
        // Handle error
        return
      }

      STPAPIClient.shared.publishableKey = publishableKey
      // MARK: Create a PaymentSheet instance
      var configuration = PaymentSheet.Configuration()
      configuration.merchantDisplayName = "Example, Inc."
      configuration.customer = .init(id: customerId, customerSessionClientSecret: customerSessionClientSecret)
      // Set `allowsDelayedPaymentMethods` to true if your business can handle payment methods
      // that complete payment after a delay, like SEPA Debit and Sofort.
      configuration.allowsDelayedPaymentMethods = true

      DispatchQueue.main.async {
        self.paymentSheet = PaymentSheet(paymentIntentClientSecret: paymentIntentClientSecret, configuration: configuration)
      }
    })
    task.resume()
  }

  func onPaymentCompletion(result: PaymentSheetResult) {
    self.paymentResult = result
  }
}

struct CheckoutView: View {
  @ObservedObject var model = CheckoutViewModel()

  var body: some View {
    VStack {
      if let paymentSheet = model.paymentSheet {
        PaymentSheet.PaymentButton(
          paymentSheet: paymentSheet,
          onCompletion: model.onPaymentCompletion
        ) {
          Text("Buy")
        }
      } else {
        Text("Loading…")
      }
      if let result = model.paymentResult {
        switch result {
        case .completed:
          Text("Payment complete")
        case .failed(let error):
          Text("Payment failed: \(error.localizedDescription)")
        case .canceled:
          Text("Payment canceled.")
        }
      }
    }.onAppear { model.preparePaymentSheet() }
  }
}
If PaymentSheetResult is ., inform the customer (for example, by displaying an order confirmation screen).
Setting allowsDelayedPaymentMethods to true allows delayed notification payment methods like US bank accounts. For these payment methods, the final payment status isn’t known when the PaymentSheet completes, and instead succeeds or fails later. If you support these types of payment methods, inform the customer their order is confirmed and only fulfill their order (for example, ship their product) when the payment is successful.
Set up a return URLClient-side
The customer might navigate away from your app to authenticate (for example, in Safari or their banking app). To allow them to automatically return to your app after authenticating, configure a custom URL scheme and set up your app delegate to forward the URL to the SDK. Stripe doesn’t support universal links.
// This method handles opening custom URL schemes (for example, "your-app://stripe-redirect")
func scene(_ scene: UIScene, openURLContexts URLContexts: Set<UIOpenURLContext>) {
    guard let url = URLContexts.first?.url else {
        return
    }
    let stripeHandled = StripeAPI.handleURLCallback(with: url)
    if (!stripeHandled) {
        // This was not a Stripe url – handle the URL normally as you would
    }
}
Additionally, set the returnURL on your PaymentSheet.Configuration object to the URL for your app.
var configuration = PaymentSheet.Configuration()
configuration.returnURL = "your-app://stripe-redirect"
Handle post-payment eventsServer-side
Stripe sends a payment_intent.succeeded event when the payment completes. Use the Dashboard webhook tool or follow the webhook guide to receive these events and run actions, such as sending an order confirmation email to your customer, logging the sale in a database, or starting a shipping workflow.
Listen for these events rather than waiting on a callback from the client. On the client, the customer could close the browser window or quit the app before the callback executes, and malicious clients could manipulate the response. Setting up your integration to listen for asynchronous events is what enables you to accept different types of payment methods with a single integration.
In addition to handling the payment_ event, we recommend handling these other events when collecting payments with the Payment Element:
| Event | Description | Action |
|---|---|---|
| payment_intent.succeeded | Sent when a customer successfully completes a payment. | Send the customer an order confirmation and fulfill their order. |
| payment_intent.processing | Sent when a customer successfully initiates a payment, but the payment has yet to complete. This event is most commonly sent when the customer initiates a bank debit. It’s followed by either a payment_ or payment_ event in the future. | Send the customer an order confirmation that indicates their payment is pending. For digital goods, you might want to fulfill the order before waiting for payment to complete. |
| payment_intent.payment_failed | Sent when a customer attempts a payment, but the payment fails. | If a payment transitions from processing to payment_, offer the customer another attempt to pay. |
Test the integration
| Card number | Scenario | How to test |
|---|---|---|
| The card payment succeeds and doesn’t require authentication. | Fill out the credit card form using the credit card number with any expiration, CVC, and postal code. | |
| The card payment requires authentication. | Fill out the credit card form using the credit card number with any expiration, CVC, and postal code. | |
The card is declined with a decline code like insufficient_. | Fill out the credit card form using the credit card number with any expiration, CVC, and postal code. | |
| The UnionPay card has a variable length of 13-19 digits. | Fill out the credit card form using the credit card number with any expiration, CVC, and postal code. |
See Testing for additional information to test your integration.
Enable card scanning
To enable card scanning support for iOS, set the NSCameraUsageDescription (Privacy - Camera Usage Description) in the Info. of your application, and provide a reason for accessing the camera (for example, “To scan cards”).