
Bridge the gap between Graph Databases and Large Language Models
HugeGraph-LLM is a comprehensive toolkit that combines the power of graph databases with large language models. It enables seamless integration between HugeGraph and LLMs for building intelligent applications.
- 🏗️ Knowledge Graph Construction - Build KGs automatically using LLMs + HugeGraph
- 🗣️ Natural Language Querying - Operate graph databases using natural language (Gremlin/Cypher)
- 🔍 Graph-Enhanced RAG - Leverage knowledge graphs to improve answer accuracy (GraphRAG & Graph Agent)
For detailed source code doc, visit our DeepWiki page. (Recommended)
Important
- Python: 3.10+ (not tested on 3.12)
- HugeGraph Server: 1.3+ (recommended: 1.5+)
- UV Package Manager: 0.7+
- Ruff is used for linting and formatting:
ruff format .ruff check .
- Enable Git hooks via pre-commit:
pre-commit install(in the root dir)pre-commit run --all-files
- Config: ../.pre-commit-config.yaml
Choose your preferred deployment method:
The fastest way to get started with both HugeGraph Server and RAG Service:
# 1. Set up environment
cp docker/env.template docker/.env
# Edit docker/.env and set PROJECT_PATH to your actual project path
# See "config.md" for all available configuration options
# If there is not a configuration file (named .env) under hugegraph-llm, run the following command
cd hugegraph-llm && touch .env && cd ..

# 2. Deploy services
cd docker
docker-compose -f docker-compose-network.yml up -d

# 3. Verify deployment
docker-compose -f docker-compose-network.yml ps

# 4. Access services
# HugeGraph Server: http://localhost:8080
# RAG Service: http://localhost:8001
The Compose configuration publishes the RAG service only on the host loopback interface by default.
For more control over individual components:
hugegraph/rag- Development image with source code accesshugegraph/rag-bin- Production-optimized binary (compiled with Nuitka)
# 1. Create network
docker network create -d bridge hugegraph-net

# 2. Start HugeGraph Server
docker run -itd --name=server -p 8080:8080 --network hugegraph-net hugegraph/hugegraph

# 3. Start RAG Service
docker pull hugegraph/rag:latest
docker run -itd --name rag \
  -v /path/to/your/hugegraph-llm/.env:/home/work/hugegraph-llm/.env \
  -p 127.0.0.1:8001:8001 --network hugegraph-net hugegraph/rag

# 4. Monitor logs
docker logs -f ragFor development and customization:
# 1. Start HugeGraph Server
docker run -itd --name=server -p 8080:8080 hugegraph/hugegraph

# 2. Install UV package manager (if not already installed)
curl -LsSf https://astral.sh/uv/install.sh | sh

# 3. Clone and setup project
git clone https://github.com/apache/hugegraph-ai.git
cd hugegraph-ai

# Configure environment (see config.md for detailed options), .env will auto create if not exists

# 4. Install dependencies and activate environment
# NOTE: If download is slow, uncomment mirror lines in ../pyproject.toml or use: uv config --global index.url https://pypi.tuna.tsinghua.edu.cn/simple
# Or create local uv.toml with mirror settings to avoid git diff (see uv.toml example in root)
uv sync --extra llm  # Automatically creates .venv and installs dependencies
source .venv/bin/activate  # Activate once - all commands below assume this environment

# 5. Launch RAG demo
python -m hugegraph_llm.demo.rag_demo.app
# Access at: http://127.0.0.1:8001

# 6. (Optional) Custom host/port
python -m hugegraph_llm.demo.rag_demo.app --host 127.0.0.1 --port 18001
The Docker deployment publishes the RAG service on the host port by default, and the HTTP API is unauthenticated by
default. Before using this deployment outside a trusted local environment, either enable the built-in Bearer
authentication with ENABLE_LOGIN=true and a strong, non-default USER_TOKEN, or configure reverse proxy
authentication. Also restrict access with a firewall or trusted network. The source launcher can still be bound to
loopback explicitly with --host 127.0.0.1.
Note
The following commands assume you're in the activated virtual environment from step 4 above
# To use vector database backends (e.g., Milvus, Qdrant), sync the optional dependencies:
uv sync --extra vectordb

# Download NLTK stopwords for better text processing
python ./src/hugegraph_llm/operators/common_op/nltk_helper.py

# Update configuration files
python -m hugegraph_llm.config.generate --update
Tip
uv syncautomatically creates virtual environment (.venv) and installs all dependencies- Activate once with
source .venv/bin/activate- all subsequent commands assume this environment - Check our Quick Start Guide for detailed usage examples
Use the Gradio interface for visual knowledge graph building:
Input Options:
- Text: Direct text input for RAG index creation
- Files: Upload TXT or DOCX files (multiple selection supported)
Schema Configuration:
- Custom Schema: JSON format following our template
- HugeGraph Schema: Use existing graph instance schema (e.g., "hugegraph")
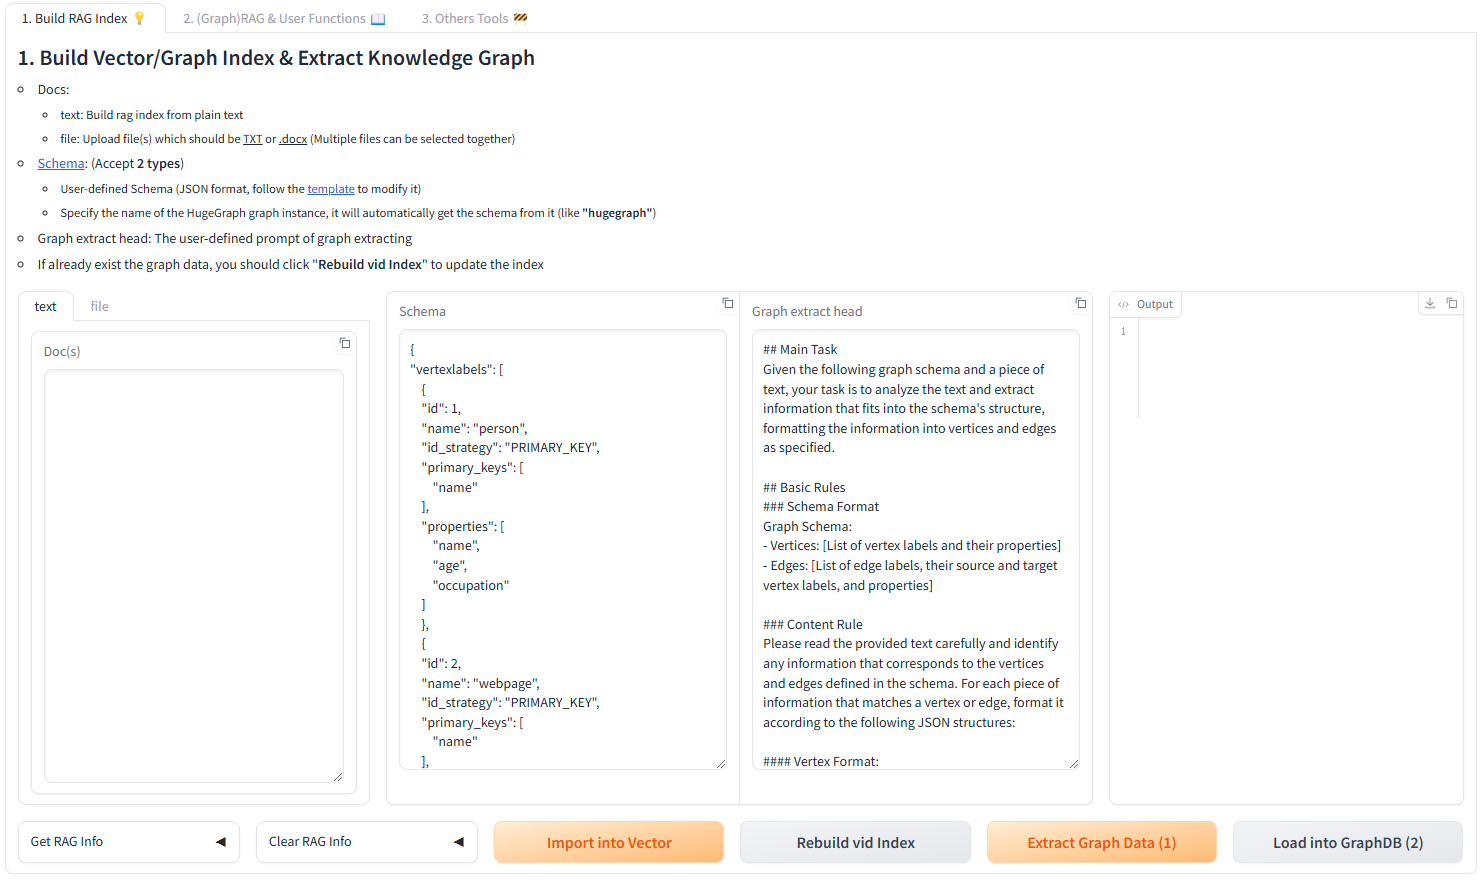
After running the demo, configuration files are automatically generated:
- Environment:
hugegraph-llm/.env - Prompts:
hugegraph-llm/src/hugegraph_llm/resources/demo/config_prompt.yaml
The system supports both English and Chinese prompts. To switch languages:
- Edit
.envfile: ChangeLANGUAGE=entoLANGUAGE=CN(or vice versa) - Restart the application: The system will automatically regenerate prompts in the selected language
Supported Values:
LANGUAGE=EN- English prompts (default)LANGUAGE=CN- Chinese prompts (中文提示词)
Note
Configuration changes are automatically saved when using the web interface. For manual changes, simply refresh the page to load updates.
The compatibility endpoints POST /graph-import and
POST /vid-embeddings/refresh are disabled by default. They are intended only
for authenticated internal callers. To enable them, set ENABLE_LOGIN=true,
replace the default USER_TOKEN=4321 with a strong random secret, and set
HUGEGRAPH_LLM_ENABLE_THIN_WRITES=true. Send the configured USER_TOKEN as a
Bearer token. Prefer the HugeGraph MCP guarded write tools for user-facing
workflows.
LLM Provider Support: This project uses LiteLLM for multi-provider LLM support.
If you previously used high-level classes like RAGPipeline or KgBuilder, the project now exposes stable flows through the Scheduler API. Use SchedulerSingleton.get_instance().schedule_flow(...) to invoke workflows programmatically. Below are concise, working examples that match the new architecture.
- RAG (graph-only) query example
from hugegraph_llm.flows.scheduler import SchedulerSingleton

scheduler = SchedulerSingleton.get_instance()
res = scheduler.schedule_flow(
    "rag_graph_only",
    query="Tell me about Al Pacino.",
    graph_only_answer=True,
    vector_only_answer=False,
    raw_answer=False,
    gremlin_tmpl_num=-1,
    gremlin_prompt=None,
)

print(res.get("graph_only_answer"))- RAG (vector-only) query example
from hugegraph_llm.flows.scheduler import SchedulerSingleton

scheduler = SchedulerSingleton.get_instance()
res = scheduler.schedule_flow(
    "rag_vector_only", query="Summarize the career of Ada Lovelace.", vector_only_answer=True, vector_search=True
)

print(res.get("vector_only_answer"))- Text -> Gremlin (text2gremlin) example
from hugegraph_llm.flows.scheduler import SchedulerSingleton

scheduler = SchedulerSingleton.get_instance()
response = scheduler.schedule_flow(
    "text2gremlin",
    "find people who worked with Alan Turing",
    2,  # example_num
    "hugegraph",  # schema_input (graph name or schema)
    None,  # gremlin_prompt_input (optional)
    ["template_gremlin", "raw_gremlin"],
)

print(response.get("template_gremlin"))- Build example index (used by text2gremlin examples)
from hugegraph_llm.flows.scheduler import SchedulerSingleton

examples = [{"id": "natural language query", "gremlin": "g.V().hasLabel('person').valueMap()"}]
res = SchedulerSingleton.get_instance().schedule_flow("build_examples_index", examples)
print(res)Why the change: the internal execution engine was refactored to a pipeline-based scheduler (GPipeline + GPipelineManager). The scheduler provides a stable entrypoint while keeping flow implementations modular.
If you need help migrating a specific snippet, open a PR or issue and include the old code — we can provide a targeted conversion.
[!IMPORTANT] > For developers contributing to hugegraph-llm with AI coding assistance:
- Start Here: First read
../rules/README.mdfor the complete AI-assisted development workflow- Module Context: Rename
AGENTS.mdin this directory as context for your LLM (e.g.,CLAUDE.md,copilot-instructions.md)- Code Analysis: Follow comprehensive analysis methodology in
../rules/prompts/project-deep.md- Documentation: Maintain structured documentation standards from
../rules/prompts/project-general.md- Quality Standards: Ensure type annotations, proper testing, and consistent patterns
- Business Logic: Focus on graph-LLM integration logic and RAG pipeline optimization
These guidelines ensure consistent code quality and maintainable graph-AI integrations.
- Graph Visualization: Use HugeGraph Hubble for data analysis and schema management
- API Documentation: Explore our REST API endpoints for integration
- Community: Join our discussions and contribute to the project
License: Apache License 2.0 | Community: Apache HugeGraph